Wednesday 28 May 2014

Rain man....

Well over at Simon says stamp Monday challenge it is time to out the artsy stamps. I love this stamp and now i have it in the original wooden backed version as i got it as a birthday pressie. So i decided to play with it.


I made the yellow one first as I wanted it to be a bit quirky. My husband said i should do it in blue to be more traditional and i obliged. So you can decide which one you like best. 


So both times I started with one of the Tim Holtz stencils, the splodgy one. On a piece of white card I chose parts of the stencils that I liked and using a make-up sponge I inked tumbled glass, broken china, peacock feathers an weathered wood for the blue one and squeezed lemonade, mustard seed, scattered straw and dried marigold for the yellow. 


I didn't really plan it out but just went with was pleasing to my eyes. Then i stamped rainman in black archival ink and this time i tried to get his boots in the 'puddle'.


 I stamped the sentiment (Tim Holtz) in black archival. To add more interest I inked some versamark through the faded dots stencil and clear embossed. I find it mimics rain somewhat.
I matted and layered on complimentary card and decided to add some ideology twine and metal tags.

These are quick cards that come in handy when you are short of time. But i still think they are pretty effective. Anyway over to you now: .......... blue or yellow? Theresa xx

I would like to enter these into the following challenges:

A blog named Hero - You're the emBoss
The Kraft Journal - Clean and Simple


Tuesday 27 May 2014

sunflower

Hello my friends. It has been a while since my last blog post. However it is not because I wanted to neglect crafting but i've had to as i have been poorly and unable to do much. I've also been stuck in bed and so not able to do much from there as walking was quite painful.


So without further ado onto today's make. I wanted to use the Stampendous sunflower so I started from there. This is a lovely huge stamp that comes with the head and stalk separate hence allowing for more options. I stamped the flower in black archival and clear embossed with detail powder. Then I masked the flower and added the stalk in the same way. I masked this off too and worked on background.


I got out my journaling set from Claritystamp and set to work. I use this set more than any other. I started by brushing antique linen and old paper distress inks all over background with the clarity brushes. Then I started stamping with the script and brushed corduroy di. I did not mount stamp as I wanted a distressed look. I tamped around edges with the burlap stamp and frayed burlap ink. Then i got the water stain stamp and inked randomly with brushed corduroy after blotting the first generation ink. I darkened edges with brushed corduroy and walnut stain.


Then it was time to colour the flower. I got out my spectrum noir pencils and set to work. I started with the lighter colour first and progressed to the darkest. I don't know how many I used but I know I started with the darkest yellow I had and progressed to a burgundy. The centre of the flower was done in the same way with the browns. I also used black in centre. The leaves again got same treatment with the greens. In the end I also added a bit of an air force blue and a grey. I do love these pencils.

They are so soft and creamy. Once I was happy with shading I added shading around flower with brushed corduroy and walnut stain and a make up sponge. Then I mounted it on black card and added ribbon to lower edge with a double bow. To add some quirkiness i added a ladybird to the centre of the bow. Then I mounted the whole lot onto kraft card. I wanted to add dew drops to add some more dimension.
I finished card off by adding 4 transparent gems to the corners and a little ceramic pot that i had in my stash. I got this idea from the lovely Emma Williams who used an ideology bottle as a vase for her flower.

I would like to enter this card into the following challenge:
Fussy and fancy - inspiration picture ( i went with colours and flower)


creative fingers challenge - thank you/anything goes
crafting from the hearth - anything goes
paper creators - flowers and bows
Fan-Tastic Tuesday - Anything goes


Monday 26 May 2014

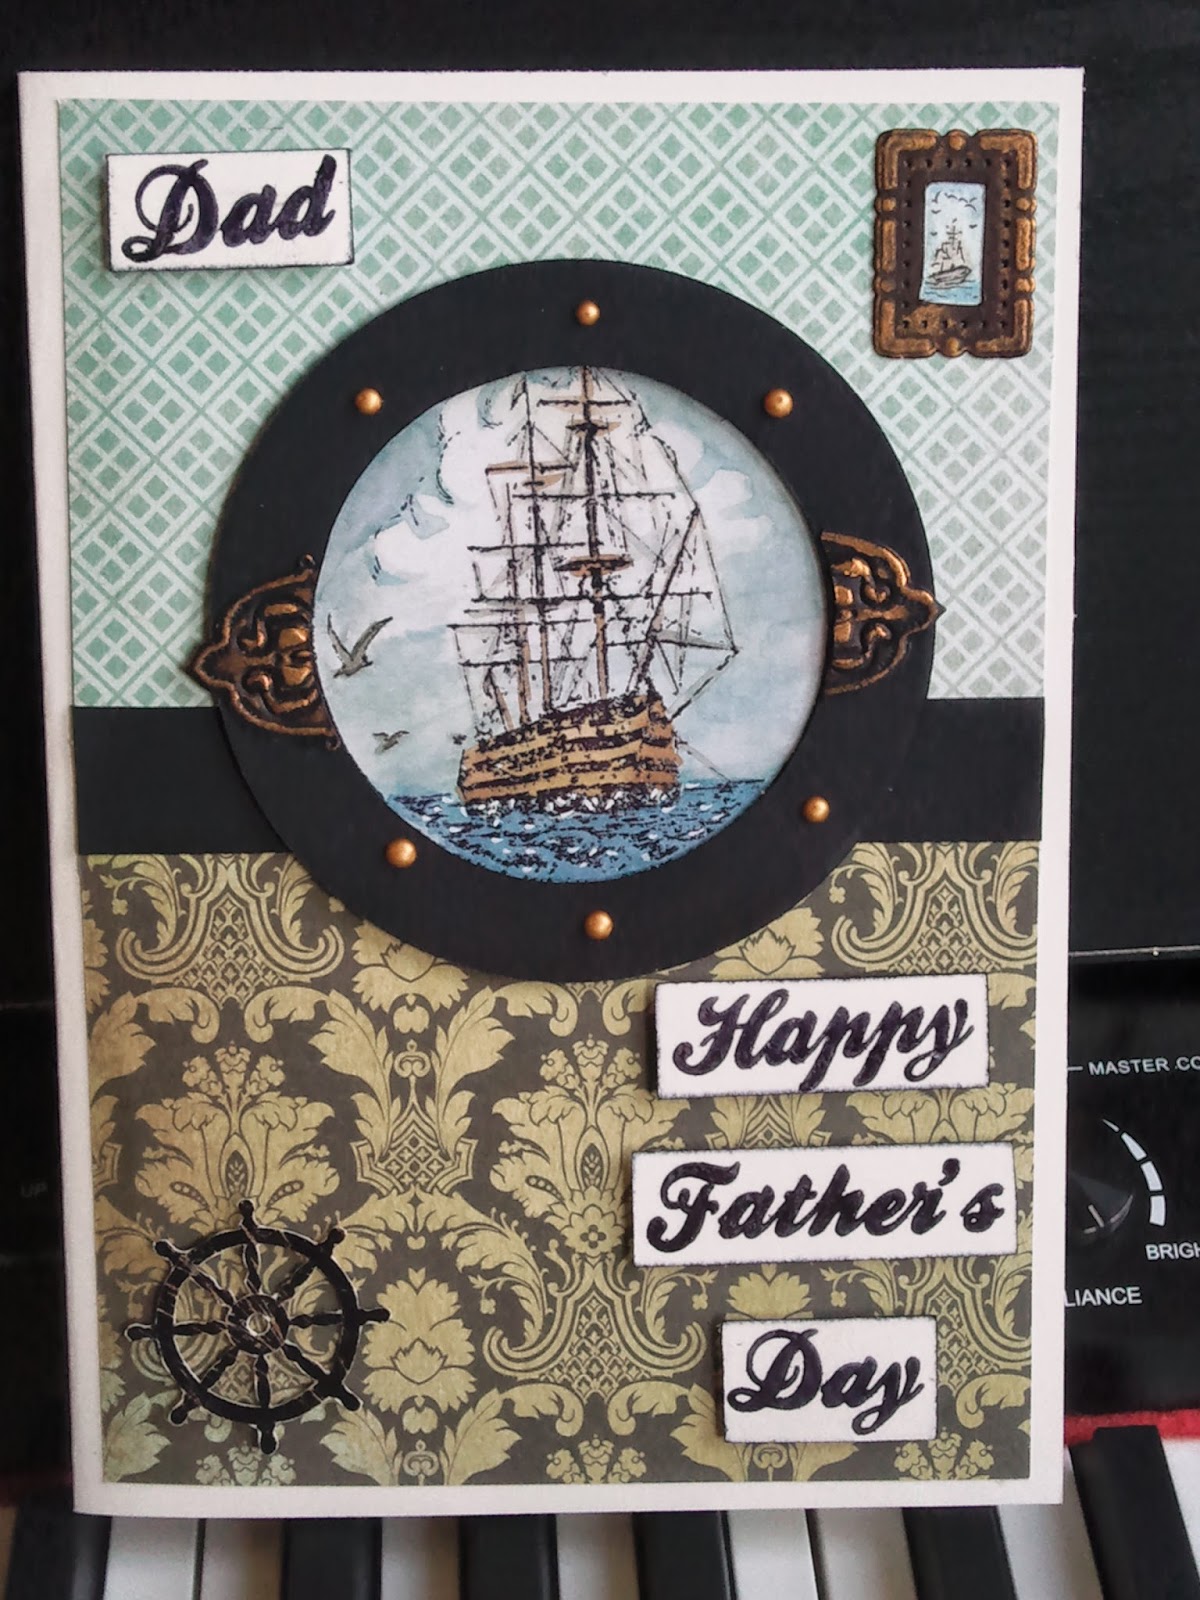
Father's Day


Today's offering is one of the father's day cards that I made. I wanted to create the illusion of being on board a ship and then I thought about this metal ship stamp that I have, a circle frame and some acetate and I could then picture it in my head.


So I set to work. I stamped the ship in black archival onto white card and coloured it in with distress markers a paintbrush and some water. Once it was dry I added some white accents to water to give impression of splashing waves. Then i cut a frame out of black card to create the porthole window. I attached acetate to it and added silicone glue to edge before sticking it down onto ship. This helped give it some dimension and as it is clear is less visible. i set it away to dry and started working on background.


Trying to catch reflection of acetate..........


So I wanted to create the inside of a  cabin on a ship but since the ship visible from porthole was the HMS Victory, I thought i needed a more opulent look. So I delved into the kaiserkraft stash of papers and chose a couple that I felt would look most like wall paper. I added a strip of black for border. Then I mounted the porthole in the middle. At this point it looked quite bare so I needed to embellish it further.
I cut 2 small spellbinders shapes from black card and enriched them with renaissance gold gilding wax to give the idea of something aged. With the little rectangle one I decided to turn it into a frame and so I cut out the centre and drew a little picture for it.
With the other one I decided to cut it in 2 to double up as hinge and latch for porthole. I added some olympic gold cosmic shimmer glue dots mimicking screws and bolts and at this point felt that it was looking more realistic.


Then I stamped the sentiment, which is from Indigoblu, in versamark and embossed in black. I cut each letter separately for ease of positioning. I inked all around the edges in black archival. I stuck dad in the top left corner and the other 3 in lower right corner which left lower left corner quite bare. So then ai stamped and embossed a ship's wheel from graphic 45 and cut it out and attached it there so then the card looked more balanced.


I do hope you like my make, Theresa xx

I'd like to enter it into the following challenges:

Fan-tastic tuesday - one for the guys
Paper crafting journey - for that special man
Rhedd and rosie challenge - no flowers/nothing floral

Thursday 15 May 2014

sweet lilac challenge and pink........

Hello crafters. Yes time is flying by and it is time for another Sweet lilac challenge which this time is anything goes.
So grab yourselves some beautiful blooms from Sweet lilac flowers and make something and join us with the challenge. There is a lovely hamper of flowers up for grabs......


So without further ado I will run you through how I made this card. This time I used Justrite stamps. I stamped the ice-cream on kraft card in coffee archival and fussy cut cone leaving a strip in middle to attach scoops to. I then stamped ice-cream 3 times on white card. I coloured them with distress pens using spun sugar, shabby shutters and brushed corduroy with a bit of vintage photo. I fussy cut the 3 scoops and mounted them as shown. The chocolate sauce is a drizzle of chocolate brown cosmic shimmer pva glue.


The cherry is from another stamp in same set. I had coloured it in with aged mahogany but as soon as I put glossy accents on it the colour disappeared. (Any suggestions as to why and what i did wrong are welcome.)  Then I cut a white mat in white and embossed with a stripey stencil from Clarity stamp. Leaving stencil in place i coloured stripes with spun sugar distress ink. I matted this on a dark pink piece of paper with a green dog tooth stripe across middle. The lattice background paper is from same set (I don't know where they are from. These papers were kindly donated by my friend Karen).


I didn't have any matching ribbon so i got some seam binding and tinted it with the inks I used to colour ice cream scoops so I knew they matched perfectly. I tied bow with the 2 colours and attached as shown. I used a pink rose and a leaf from Sweet lilac flowers to 'dress' the bow as I thought it looked a bit bare.
The sentiment is again from same stamp set. I stamped in coffee archival and coloured in shabby shutters. i die cut it with a spellbinders die and inked lightly with spun sugar while still in die.


Finished card is A5. I hope you like what I made this time, Theresa xx

I would like to enter this in the following challenge:


Wednesday 14 May 2014

awesome dude

When I was at Ally pally last month I had Massimo with me. While browsing at the Visible image stall he noticed the character stamps and wanted to get them all as he really liked them. His favourite was immortal Edward. 


So we left the stall with 3 sets of stamps. So I decided to play with hem this week. I really like this little chappie and I think he looks a lot like Massimo. I can imagine him striking exactly the same pose.

Anyway enough of my waffle and back to card. I started with a piece of centura card and using reverse side i embossed the brick wall stencil on it. Leaving stencil in situ I started adding colour with distress inks and stencil brushes. I used antique linen. old paper, tea dye, rusty hinge, brushed corduroy, vintage photo and walnut stain.


Using a texture stamp from same set and vintage photo and walnut stain i stamped randomly over background thus adding texture to bricks. Then using black soot and the stars i stamped them randomly along 3 sides. I matted it on black and stuck it to base card.
On a separate piece of centura card I stamped Jake with black archival and clear embossed him. I coloured in using promarkers. I added glossy accents to his eyes, wrist bands, collar, strip on cap, star on trainers and the axles on wheels.


I fussy cut him and shaped him and stuck him to wall. Then I stamped and embossed sentiment and cut it out with a spellbinders die. I cut a faux nestie in black and attached overlapping the wall. I finished card off with some cosmic shimmer glue dots and a star from my stash.


I hope you like my make especially as this is the first project using Visible image stamps, Theresa xx

I would like to enter this into the following challenges:

Visible Image challenge - anything goes
Fan-tastic Tuesday challenge - clean and simple


Wedding card - die crazy

Well my friends, this was the card that i made for my brother and his now wife for their wedding day. I wanted it to be mostly white as i think white on white is really elegant. 
I just wanted to add a touch of colour that went with the colour scheme.


I knew the bridesmaid's dress was a peacock green so I decided to tint the flowers to match.
Most of the dies used here are from the heartfelt creations range of spellbinders. I cut the window and removed crossbars. Then i diecut lattice background extending it to fit my card. I stuck window to centre and cut away the centre of lattice so you could look through window.


Next I turned to flowers. Thy are a matching set of stamps and dies. I stamped on white card with versamark and embossed with white powder. I cut them out with matching die. Then I inked them with peacock feathers distress ink and added a tiny bit of shabby shutters to give it a bit more of a greenish tinge. I cut in betwwen petals and shaped with embossing tool and assembled as shown.


I stamped the calla lilies from Clarity stamp on another piece of white card in versamark and went over it with white perfect pearls so it would peek through window.
I stamped the sentiment again from Clarity stamp in black archival and cut it banner style. i inked the edges lightly.


I assembled the card as shown adding some organza ribbon and some pearl swirls to finish it off.

As always I hope you like what i made, Theresa xx

I would like to enter this card in the following challenge:


Monday 12 May 2014

M is for marionettes....

This was a commissioned card that I had been asked to do a few months back and had never blogged it. I had just bought the set of marionettes, hands and theatre stencil from Clarity stamp and really wanted to use them. Luckily the recipient was somebody that loved anything to do with theatre.


So I started by embossing stencil on taupe card. I inked outer frame with brown distress inks and cut it out. Then I embossed burgundy velvet paper and cut out the curtains and assembled as on stencil. Next i did the floor which I again coloured with distressed inks.


I then embossed the lights on kraft card and used tarnished gold embossing powder to emphasize detail.
Then the marionettes followed. I stamped them in coffee archival ink onto kraft card and further stamped on kaiser kraft papers to paper piece their clothing. I used glossy accents on limbs and face to make them look more like wood.


I embossed one last piece of kaiser kraft paper for the theatre background and again embossed with tarnished gold powder to pick up the masks.
Then I stamped hands 3 times on ivory card so I could decoupage it. I coloured the hands with the spectrum noir pencils.


The last piece of 'artwork' is the mask that i stuck in corner, I again stamped it 3 times so I could decoupage it and again coloured it in with spectrum noir pencils. I assembled the card as in the pics and decided to hang marionettes from hands using thread. This was a labour of love and the most fiddly part of the card.


The base card was kraft card on which i simply stamped the sentiment in coffee archival.


As always I hope you like my make, Theresa xx


I would like to enter this card into the folloing challenges:

pile it on - fuzzy
Paper crafting journey - spot's and/or stripes

Saturday 10 May 2014

triple emboss

For today's offering I started with a piece off one of the graze boxes and cut a tag out of it. I gessoed it and coloured it with neutral acrylics. Then i triple embossed it and added frantage colours on final layer. I stamped onto the tag while embossing powder was still warm having inked stamp with archival black.


Once it had cooled i added ribbon and fibres to match.
Then I set about preparing base card. I used poppy stalk which looks like a flourish and stamped it randomly, along with another postcard stamp.
Finally I stamped the sentiment.
The stamps are from Stampendous.
The sentiment is from Claritystamp.

I hope you like my make, Theresa xx

I would like to enter it into:


Wednesday 7 May 2014

five

I have recently bought some luminarte pourable radiant rain inks and I had been looking for an excuse to play with them. I decide to use the stamps from Designs By Ryn and knew I wanted to use the leaves.


1.So I chose 5 colours of inks. I pipetted afew drops of blue, pewter and red pearl on my craft sheet, spritzed with water and swooshed the card through it till I was happy with colour.


2. Using an artist texture sponge, I sponged a bit of pink grapefruit and sunshine yellow on top. (I wish you could see the shimmer that I can see!).


3. I then stamped in black archival ink. I used 5 stamps: 3 leaves, a droplet and the coral which in this case can be interpreted as twigs.


4. I bleached some colour from droplets with water and added a little white to highlight them and then covered them in glossy accents to increase water resemblance.


5. I matted and layered on complimentary colours and stuck to base card. Finished dimensions are 6x6.


I hope you like my make, Theresa xx

Seeing that I used a lot of 5's in the making of this card and that the pattern obtained by leaves could be described as a flourish I would like to enter it into the following challenges:
Fan-tastic tuesday - Flourishes
Countryview challenge - nature's glories