Tuesday 29 July 2014

j is for jewel tones...

Hello. Today's card has again evolved from a gelli print that to me didn't look like much by itself! Again if you look closely you can see that i used my favourite stencil - swirly leaves from Claritystamp.


So I decided to add some grunge paste over it to see where it would take me.... I masked off some of the poppy stencil as i wanted to leave a corner empty to be able to stamp a sentiment. And below is the result.


Then came the debate of whether to add colour or not and finally went for colour. So i put stencil down again and with loads of masking and patience I added festive berries distress ink and aged mahogany to poppies and peeled paint and forest moss to leaves and buds.


Then I thought it needed a bit of bling and i went over the flowers with clear wink of stella and left to dry.


Difficult to show up in pics - wink of stella i mean. After a few days i noticed that the colour had really faded and had gone nearly to grunge colour.


So I scribbled on a tile with the distress markers and picked it up with the clear wink of stella and went all over flowers again. I used make-up sponge over green areas.


Maybe here you can just see the twinkle....


My next dilemma was what sentiment to use and finally i settled for always from the word chains by Clarity stamp, as i felt it was quite apt since i had poppies as main image.


Matted on black and stuck to white base card.

Finished card is 8x8 and as usual i do hope you like my make, Theresa xx


I would like to enter this card in the following challenges:

Simon says stamp Monday challenge - j is for jewel tones (citrine, amber, onyx, ruby, green jade)
Fan-tastic Tuesday - anything goes challenge 46
Crafting from the heart - anything goes challenge 29


Sunday 27 July 2014

clarity club .....

Hello my friends. As some of you might be aware, every month we receive a new stencil and stamp if you are a member of the Clarity club. Details can be found here.
Now Margaret Craner who is also a member of said club came up with the idea that we need to use both stencil and stamp to create something in an hour. This is my attempt and it took less than that if you exclude drying time.


Below are the ingredients I used to create this topper/card.


So I created a border (about 3/4") around the 7x7 gelli card and stamped all around with the club stamp. Sorry but I can't remember name. I did google them to work out what colours to use to colour flowers though. I coloured them in with spectrum noir pencils.


Next i covered the ginko with masking tape on stencil and taped it down to card. Using make-up sponges and distress inks, i inked the images through the stencil. I dried with heat tool and cleaned stencil.


Then i put stencil back on over inked image and secured it. I used transparent cosmic shimmer texture paste over image, carefully removed stencil and covered in micro beads.


I stamped Happy birthday in black archival ink and voila'.


To finish card off I did mat it on black and attach to white base card but i forgot to take a pic.... please forgive me....


As always i hope you like my make, Theresa xx


Tuesday 22 July 2014

create with your soul......

Hello my crafty friends.  Today's card is made up using Visible Image stamps. They have some beautiful images that can be adapted to a number of occasions.


I started with the background. I used the reverse side of centura pearl card (not shiny side). Then I inked with distress inks. I used evergreen bough, peacock feathers, broken china and tumbled glass. Then i put rubber bands round the brayer, spritzed generously with water and rolled across background. I left it on for a few seconds and then rolled kitchen paper over it to dry it. To make sure it was dry,I also gave it a blast with heat gun.


Then using same distress inks I stamped the small feather randomly and also the splodge from same set. I dried them with heat tool again.
Then I stamped the sentiment (which I love) in versamark and heat embossed in black.


Next it was time to pay attention to the corners and for this I used stamps from the new set. On the lower corner I used the large fleur-de-lys with the swirl and embossed in Ranger antique gold. I did same in opposite corner but used the small fleur-de-lys.


Then i added enamel dots (Ranger) in black and white and I felt this made the image pop.
Then it was time for some matting and layering and finally stuck it on white base card.

finished card measures 8x8.


I hope you like what I have made.

I would like to enter this in the following challenges:

Visible image - anything goes
Sunday Stamper - Dream(dreamy background and sentiment)
Simon Says Stamp Monday challenge - midsummer (the colours of the sea)
Fan-Tastic Tuesday - anything goes


Thursday 17 July 2014

it's all about girls.....

well today's cards are quite girly as the title suggests. I made these a while back but never got round to posting them. When I went to look over at the fussy and fancy website, the current theme is all about girls and so i remembered I still had these to post.


Both the images are done by paper piecing. These cards were inspired by Jo Rice's makes in Creative Stamping magazine issue 15 I think. All the papers are Kaisercraft.
The stamps for the card below are all from Claritystamp, while for the other card they came free with the magazine.


Images were stamped in potting soil archival ink several times and decoupaged for dimension. Skin was coloured with distress markers, namely tattered rose. Inking was done in tumbled glass DI.


The ribbon was from my stash and the button is a Tim Holtz accoutrement. I finished it off with some pearls on one card and cosmic shimmer chocolate pva glue on the other.

I hope you like my makes. I tried to keep the post very brief today....., Theresa xx

I would like to enter this card in the following challenges:

Fussy and fancy challenge - it's all about girls
Fan-Tastic Tuesday challenge - anything goes
Through the craft room door - anything goes
Twisted tuesday - pearls and lots of layers
Crafting from the heart - anything goes

Tuesday 15 July 2014

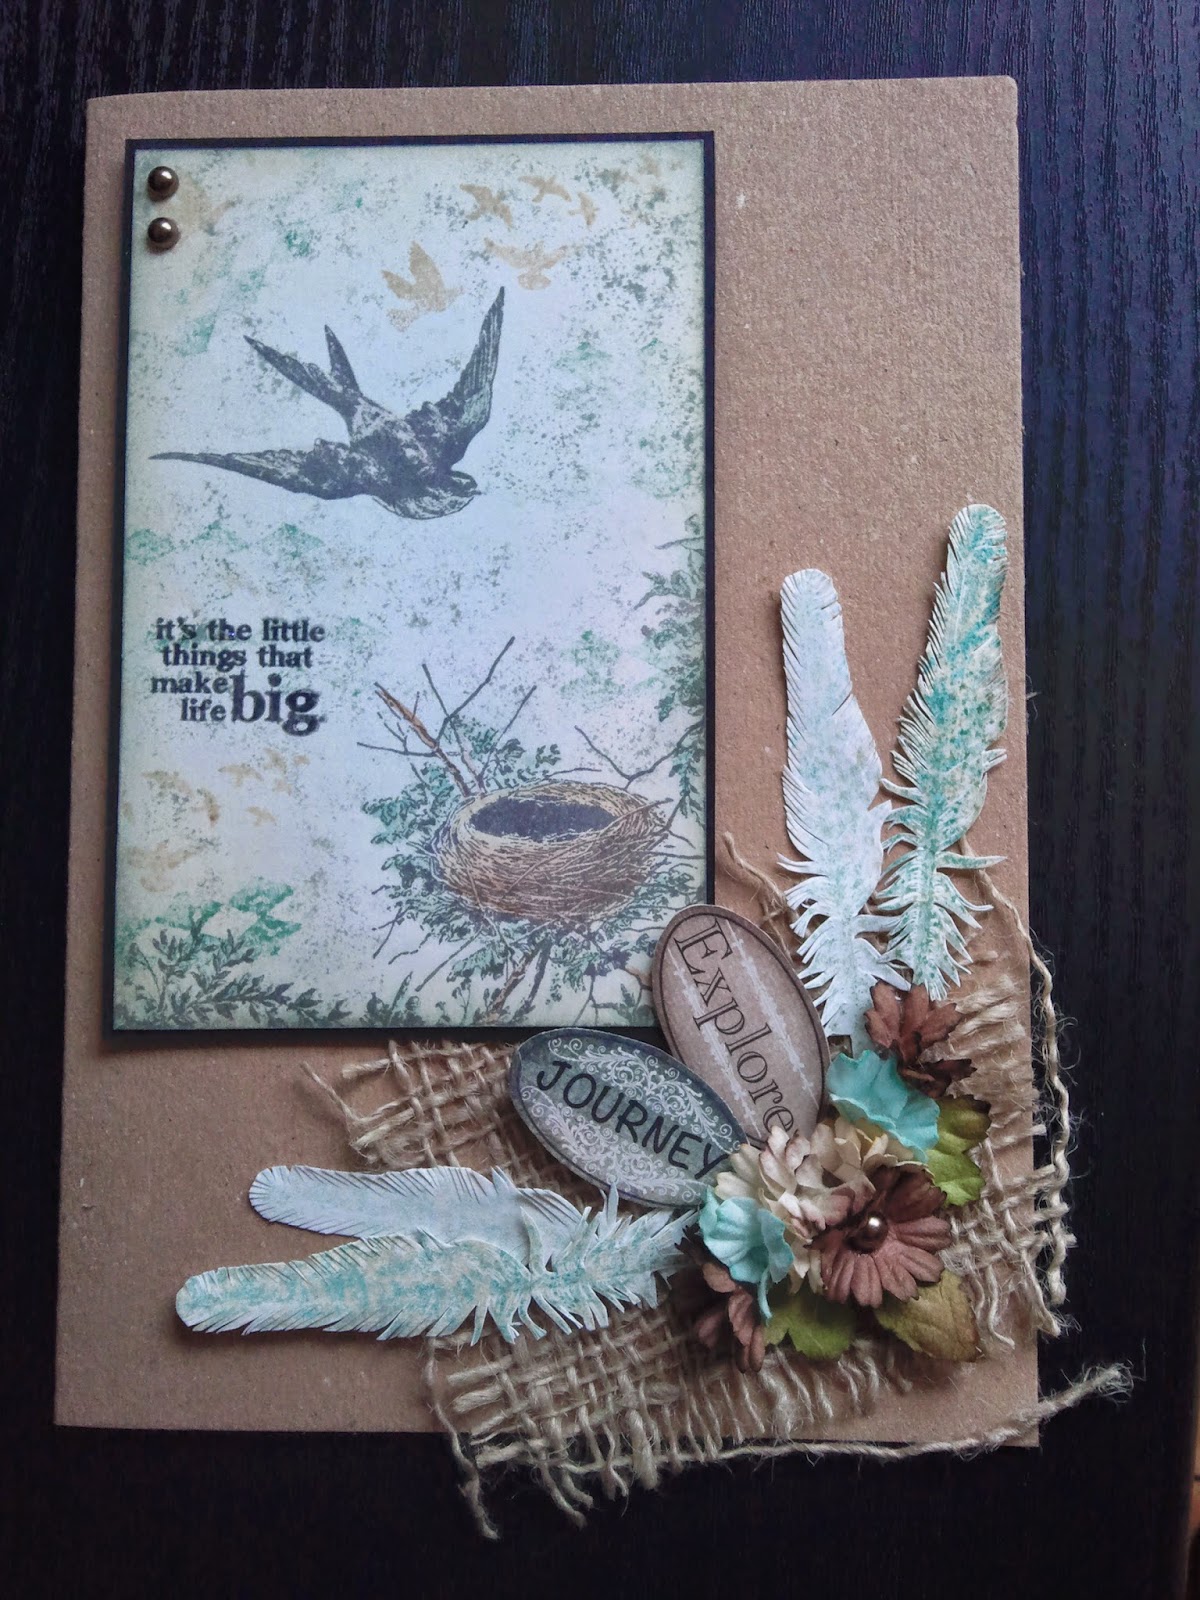
birds of a feather

Well time is really flying and if blogger is working properly this should be published on the 15th of July for the launch of a new Sweetlilac flowers challenge.
At this time I should be sunning myself.......


Back to the card....I started with a piece of white card. Using watering can archival ink i stamped the nest and the swallow from a Tim Holtz set. (They are a smaller size)Then i used old paper and tumbled glass distress inks and tinted the card using stencil brushes. Around edges I added some antique linen and then some iced spruce with a blending tool.


I then used antique linen, vintage photo, evergreen bough distress markers to colour images. Using same colours of distress inks I used Tim Holtz mini stamps around the background. Then I stamped sentiment from Tim Holtz in black archival and clear embossed.

 
You can see embossing in this pic.


For the embellishments I chose Sweetlilac blooms that had the same tones as my main image. I arranged them on a piece of burlap to add texture and added a pearl on main flower and some leaves underneath.


The 2 small tags are fussy cut from some heartfelt creations papers. I thought they really went well with the colour tones of card, but see what you think.


The feathers, again a Tim Holtz stamp, are stamped in first and second generation ink and fussy cut. Then i tucked them underneath the flower cluster. 
The whole card was then mounted on kraft card and I added 2 brown pearls at the top left hand side of topper.

So I hope you like my offering. Please join us over at sweetlilac challenge. Don't forget the winner will get a lovely hamper of Sweetlilac flowers, Theresa xx


Monday 14 July 2014

Tag

Well at my son's school there are some teachers that are retiring and he asked me to make some cards for them. This is one of those cards.


I started with a manila tag and stamped the lady from pomp and pageantry from Indigoblu in second generation black archival ink. I think this woman is very strong and determined and you could see this from her face. I coloured her with distress markers mainly tattered rose, weathered wood and tumbled glass. 
Then I set about preparing the background. I masked image and stamped various images in different brown distress inks from Sarah's choice and the flourish again from pomp and pageantry. Then i inked the background with distress inks and added shadow around main image.


I added some Tim Holtz tissue tape below lady and across one upper edge and inked up those areas again.
As I didn't have matching ribbon I tinted some american seam binding in matching inks and tied a double bow. I added a Tim Holtz accroutement over the bow and some ideology flowers at the bottom corner.

And that is the finished tag.

The card was created with same stamps, but in more faded colours so as not to compete with the tag.


Hope you like my offering, Theresa xx

I would like to enter this tag card in the following challenges:

IndigoBlu challenge - tag....you're it (tag)
Simon says tamp monday challenge - about a face (finished card)
Simon says stamp wednesday challenge - let's be clear (glossy accents)


and this is the finished card with a Tim Holtz sentiment and glossy accents over the R

Friday 11 July 2014

two fer day.....


Today I am featuring 2 cards. I did not make these unless you consider matting on black and sticking to base card as 'making a card'. The artwork was done by my lively 6 yr old Massimo.


These are the thank you cards he has made for his teachers. This first one is for his year teacher Mrs Chester. He said she likes the warmer colours so he wanted a warm sunny picture. 


So some masking first. Then using the ink dusters he created background. He loves making these kind of pictures as they are quick but striking. He used, festive berries, ripe persimmon, dried marigold, mustard seed and squeezed lemonade and shabby shutters. Then he decided it needed a bit of brown and I handed him fired brick which he thought was an awesome colour. He put a tiny bit on the upper edge. and I think he was so right!


The images are all from Claritystamp and were stamped in black archival ink. I do hold his hand a little bit here so as to keep stamp steady. The sentiments are also from Clarity stamp.
Notice the 3 little birds? Yes you guessed it. Mummy manages to smudge it when matting so had to salvage it :).


This card is for the TA Ms Malick. Here he used chipped sapphire, faded jeans, dusty concord, picked raspberries, tumbled glass for the sky. He then said it wasn't night enough and decided to add a bit of black soot. This transformed it. The hills are inked in bundled sage, peeled paint and forest moss.


It was his idea to have owl 'in the moon' - his words.


I am biased I know but I do think that these cards are stunning in their simplicity!

If you enjoy them too, do leave him a comment. He will be thrilled! I wish I could have captured his enthusiasm when he was making them......., Theresa xx

I would like to enter these in the following challenges:
Claritystamp challenge - anything goes
Fan-Tastic Tuesday  anything goes
Sunday Stamper - hello and goodbye

Thursday 10 July 2014

Thank you .....

Today it will be a very quick post. Just pictures. If you would like details of how to make these cards please look at Barabara Gray's blog here.


I needed 4 thank you cards for my little boy as he finishes school tomorrow and the blog post from today gave me the inspiration.


Hope you like my offerings, Theresa xx