Saturday, 13 December 2014

15th birthday ....

Hello again. It's been some time since my last blog but finally I've found some time. This was the card I made for my husband's niece's 15th birthday.


below is a pic of everything I used bar the stencil I think. Not usual that I'm so organised, lol!


I started with a piece of 7x7 gelli card and using Jo's bubbles I brushed the adirondaks through it making sure I overlapped colours.


Next I stamped and embossed the lacey birds, followed by sentiment which I curved to make it fit between the beaks.


Using spectrum noir pencils that matched the inks, I coloured in the birds.


Finally I stamped and embossed a mini corner in all 4 corners and added some colour with the pencils. 
I added a black outline with a ruler and a sharpie pen.


The 15 is a diecut on my slice machine which i embossed in kaleidoscope to add some sparkle.
A few gems and some matting and voila'.

I hope you like my offering.

I would like to enter this card in the following challenges:

TTCRD - anything goes


Saturday, 6 December 2014

gaudete.....

Hello there. It's a two fer day. Both cards feature the same stamps and embellishments but are worked using different background card colour. Both stamps used are from Visible Image. 


The first card I made as soon as I received the Gaudete set was the kraft card one. I stamped the lLatinverse in versamark and embossed in ivory.


On another scrap of kraft card I stamped the sentiment and again embossed in ivory. I cut it banner like and matted it on ivory card.


The bauble is from a Cottage Cutz die. I cut it from ivory card and added gold embossing powder to ribbon, star and halos. I added acetate to the back and a gold string from which to hang bauble.


I mounted the card as shown and as a final touch I just added some gold glitter pen to the capital letters in verse and sentiment.


The second card I made, I started with black card and embossed in gold detail powder. I added some ivory frantage to grunge it up a bit.


 The bauble this time I cut out of antique gold card and embossed ribbon in ivory and star and halos in gold.


I hope you like my makes as much as I enjoyed making them, Theresa xx.

I would like to enter these cards in the following challenges:

Visible image - 'tis the season
Fan-Tastic Tuesday - anything goes with a twist - let's see some embossing
TTCRD - anything goes


Monday, 1 December 2014

Noel.....

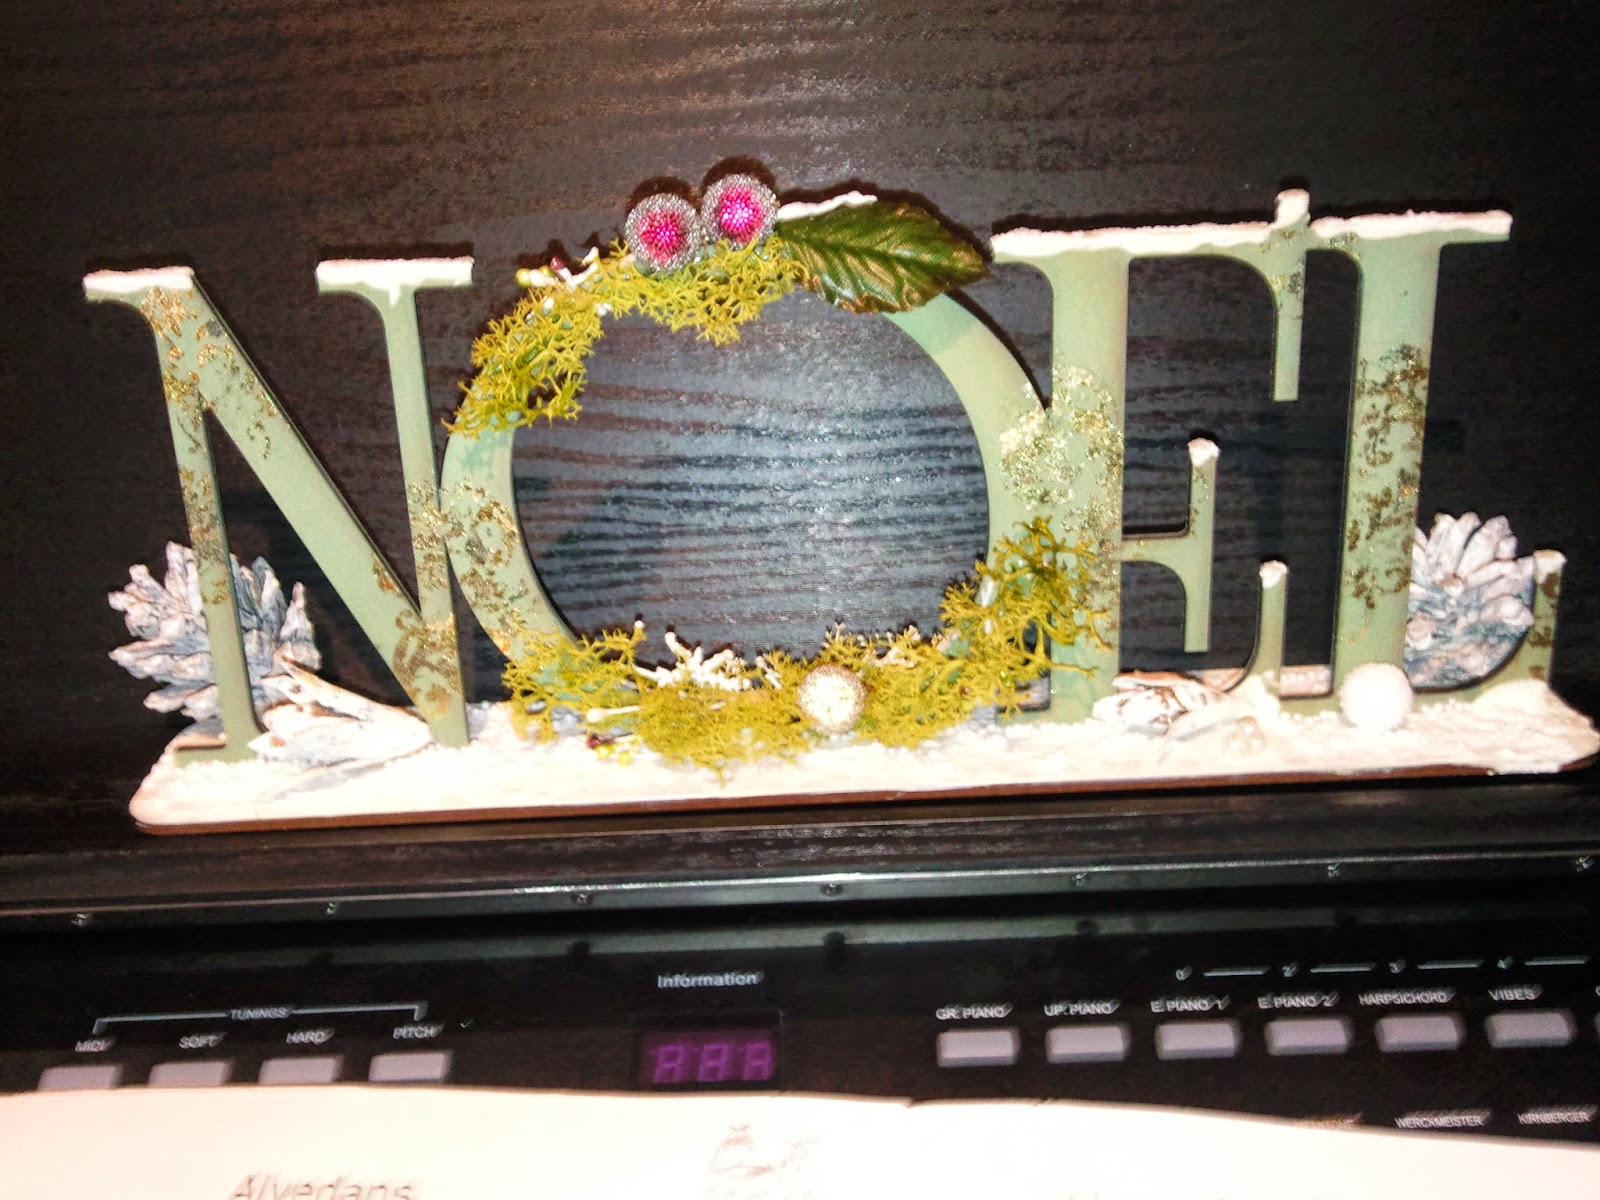
Hello again. Today i'm posting another of the ornaments that I have been making for Christmas.


The wooden ornament is another of the designs by Anne-Marie Designs. i coated it in white gesso and painted the word in a mixture of greens and the base in matt and metallic white.
Once dry I stamped the dinkie vintage flourish by IndigoBlu in glue and gilded it in variegated green flakes.


I stuck word to base with cosmic shimmer dries clear glue and added white puff paint by paperartsy. I also added some of this to words and heated it so it puffed up and resembles snow. I again added some cosmic shimmer and added iced diamond to it. This adds a shimmer without it being glittery.
Finally i added some embellishments in the form of moss, berries, pines beads etc.


I do hope you like it. It looks much better in real life, Theresa xx

I would like to enter this into the following challenges:

Sunday stamper - Christmas
Simon says stamp monday challenge - Holiday cards (well Holiday ornament)
As you like it challenge - favourite Christmas embellishment ( gilding flakes as they give a vintage feel and also glitter as it makes things spakle)
Country view challenge - Nostalgic Christmas
Fussy and fancy - happy holidays


Saturday, 29 November 2014

meltpot time!


Yes yes yes! I have played with my meltpot for the first time. Yes Hels finally I got it out of it's packaging.


I made this card for my friend's 60th birthday. 
I started with a manila size 8 tag that I inked using evergreen bough, faded jeans and weathered wood distress ink. i used most techniques learnt at Hels's workshops so if you want to know how please visit her blog here.


I flicked some picket fence stain at the tag using a brush.
I made the flower using the big die from the tattered flower and the same paper that can be seen on background. I also cut some foliage from the new sizzlit dies.
Then out came the meltpot and the clear UTEE and I glazed teh flower and foliage.


The ribbon is american seam binding that was dyed using evergreen bough and faded jeans distress inks. i tied a messy bow with it.
Then i made the little tag and stamped the sentiment in hydrangea archival and embossed in crystal embossing powder.


I mounted it on the same paper as I made flower from and used a remnant of the ribbon I had left. 
As a finishing touch I added some white enamel dots over tag.

I would like to enter this card in the following challenges:

Sunday stamper - love (made with a lot of love, and loving the meltpot)
TTCRD - anything goes


Tuesday, 25 November 2014

vroom, vroom.....

So this time I'm back with a card that is created with Claritystamp stamps and stencils. I bought the motorcycle stamp recently and was itching to use it. I needed to make a male birthday card and I thought that this would be the right time to use it.


So I started by stamping the Harley in black archival and clear embossing it. I then masked it and got to work with the brick wall stencil. I masked off the arch and the floor area and also the bike.
Using the clarity brushes and various brown distress inks, I blended them through stencil. i added some texture over bricks by stamping in aged mahogany with a texture sponge. I also darkened area around arch as this creates depth and makes it look rounded. 


For the ground I used the chess stencil and pumice stone distress ink after masking off the brick wall area.
Then it was time for the scene inside the arch. I put a sun mask and masked off the brick area and inked the sky again with the brushes. Then using a strip of torn copy paper i set about inking in the fields. 
The trees, fences etc are all stamped in black archival.


Finally I inked the sun and then coloured in the Harley using Spectrum Noir pencils. I used a silver sakura pen for the metallic areas and used glossy accents over the red areas. It is really difficult to see in pics although i tried various angles.


I hope you like my make, Theresa xx

I would like to enter this card in the following challenges:

Fantastic Tuesday - anything goes with a twist - add a tree or two
TTCRD - anything goes


Friday, 21 November 2014

snow and sparkle......


Well I hope you don't mind me being back again. Today's offering is created with Lavinia stamps. I bought some at he NEC and decided to use a couple of them. 


So i stamped the door and pathway on post its and cut them out for masks. I laid the pathway mask down where I wanted it stamped and stamped the door first in black archival.This helped me lose the 2 steps on the door which didn't fit the picture I had in my head.


I then masked the door and stamped the pathway. I used black archival ink. Then I masked pathway again and inked upper part of background. I used crushed olive distress ink as a base for all card as I wanted a greenish hue to emanate to give the impression of age and neglect. 


For browns i used tea dye, rusty hinge, brushed corduroy, and vintage photo. I darkened area around door with vintage photo and gathered twigs.
Then i tore a piece of copy paper and made the snow using tumbled glass and weathered wood.


I then stamped the rest of the picture. I used the creeping vine for the vegetation above door. I stamped it in first and second generation black archival. I also used the upper edge of it to stamp at the bottom.


The vegetation along snow ridges I stamped using a star shape that came in one of the sets, possibly the QVC one which on the Lavinia website is called stars 2.


I flicked water at picture and dried with kitchen roll. I added white pen highlights to some of the bleached areas to mimic falling snow. I coloured The door and pathway with a damp brush and distress ink.
As a finishing touch I added iced diamond stickles to snow and pathway and then I clear embossed the door to resemble glass.

As usual i hope you like my offering, Theresa xx.

I would like to enter this card in the following challenges:

Lavinia blog challenge - snow and sparkle
TTCRD - anything goes
Addicted to stamps - make your mark


Wednesday, 19 November 2014

Two fer day

Hello. I'm back again and today i have 2 cards on offer. Both are created with IndigoBlu stamps.


In the first one I started with a piece of graphic 45 paper that i am sure i bought because i liked the flipside of it. But then i saw this area and I got an idea which I wanted to try out.


So I stamped the bow in red geranium archival ink and masked it off. I then  stamped the wreath in fern green and olive archival ink. Thus the bow was at the front. The sentiment was already on the paper but i just enhanced it with a sepia pen.


I covered the front of a 7x7 card with the gutted piece of g45. I matted the topper on chestnut card thus hiding the gap, whilst aligning the topper. I finished it off with some berry red cosmic shimmer pva, some glitter pen highlights on wreath and finally sepia glossy accents on bow.


My second card is similar to my guest design piece which you can find here. The difference is that it is a whole stamp and i embossed in gold detail powder.


I used same browns for inking and the script. For the little snowflakes i used peacock feathers 1st, 2nd and 3rd generation ink.


I coloured baubles with peacock feathers DI and a damp brush, added some glitter highlights and covered them in glossy accents.


I matted and layered and used a teal base card which made the peacock feathers DI pop.

Well i do hope you like my offerings, Theresa xx

I would like to enter these cards in the following challenges:

IndigoBlu challenge - magical masking
TTCRD - anything goes
Fan-tastic Tuesday challenge - anything goes with a twist - masculine: 1st card
Just Inspirational challenge - frame it - 1st card